Long file names first appeared in Windows 95, almost 30 years ago. Despite this, Windows 10 and Windows 11 are still installed with 8.3 file names enabled by default. For example, after a clean install of Windows 11 Pro, there are more than
80,000 8.3 file names present on C:\, including the notorious PROGRA~1:
Microsoft Windows [Version 10.0.26100.1150]
(c) Microsoft Corporation. All rights reserved.

C:\>dir c:\ /a /x
 Volume in drive C is Windows
 Volume Serial Number is 3EF6-4338

 Directory of c:\

2024-09-14  12:20    <DIR>                       $Recycle.Bin
2024-09-14  12:17    <JUNCTION>                  Documents and Settings [C:\Users]
2024-04-01  09:26    <DIR>                       PerfLogs
2024-09-14  12:19    <DIR>          PROGRA~1     Program Files
2024-09-14  21:16    <DIR>          PROGRA~2     Program Files (x86)
2024-09-14  12:19    <DIR>          PROGRA~3     ProgramData
2024-09-14  12:17    <DIR>                       Recovery
2024-09-14  12:17    <DIR>          SYSTEM~1     System Volume Information
2024-09-14  12:20    <DIR>                       Users
2024-09-14  12:19    <DIR>                       Windows
2024-09-14  12:18            12.288 DUMPST~1.TMP DumpStack.log.tmp
2024-09-14  12:18     1.207.959.552              pagefile.sys
2024-09-14  12:18        16.777.216              swapfile.sys
               3 File(s)  1.224.749.056 bytes
              11 Dir(s)  44.849.307.648 bytes free
8.3 file names cause several problems:
While
%windir%\system32\fsutil.exe 8dot3name strip can be used to strip existing 8.3 file names from a volume at any time,
it is preferable to turn off 8.3 file name creation as early as possible. Otherwise, 8.3 file names will inevitably accumulate in the registry. Also, when you run fsutil.exe on a live system, many files could not be processed because they would be in use. Therefore, it is best to strip 8.3 file names before Windows has even started for the first time. There are two distinct methods to achieve this, each of which is sufficient:
Method #1 – Stripping 8.3 file names during Windows setup
- Boot from an installation media (Windows DVD, USB stick, PXE).
-
Windows Setup can either run in the more modern
ConX
variant or in legacy mode. We need Windows Setup to run in legacy mode.
- Prior to Windows 11 24H2, Windows Setup will typically already run in legacy mode.
-
Windows 11 24H2 will typically run in the
ConX
variant of Windows Setup, but you can easily switch to legacy mode:
- On the Select language settings screen, click Next .
- On the Select keyboard settings screen, click Next again.
- On the Select setup option screen, click Previous Version of Setup.

-
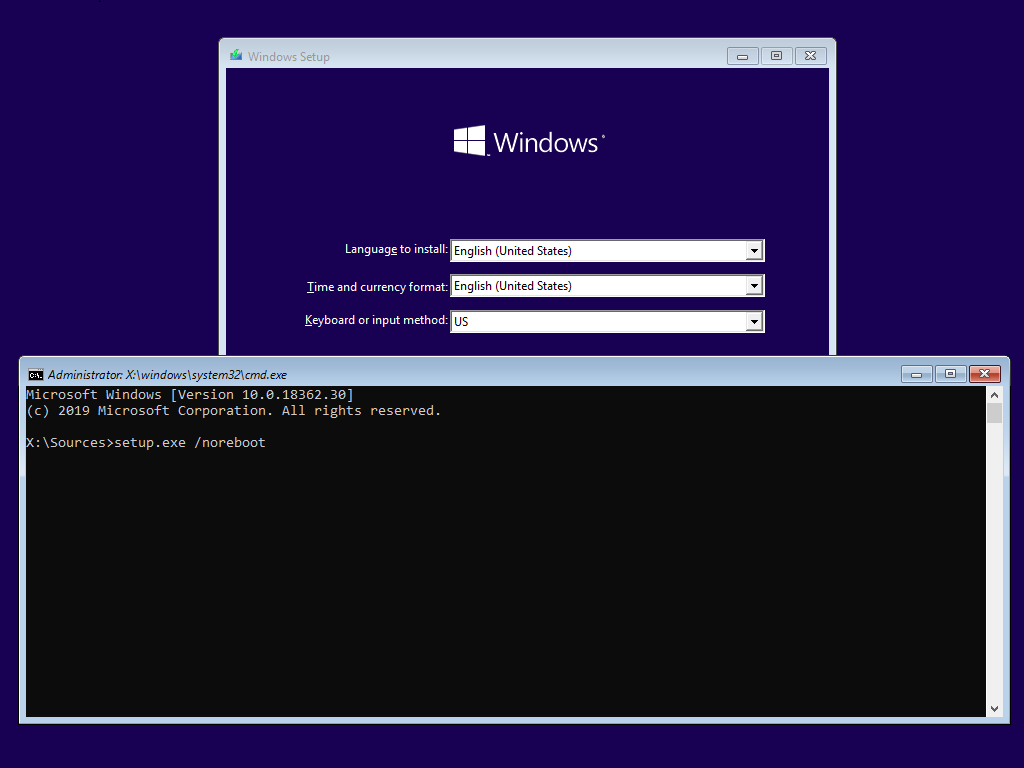
As soon as you see the legacy language and keyboard selection dialog, press Shift+F10 to open a command prompt and run
setup.exe with its /NoReboot option:
- Type
setup.exe /NoReboot if you want to install Windows interactively.
- Type
setup.exe /NoReboot /Unattend:D:\notautounattend.xml if you want to install Windows using an answer file (D:\notautounattend.xml in this example). Note that the filename of your answer file must not be autounattend.xml since Windows Setup would have already applied that file at this point, leaving you with no opportunity to strip 8.3 file names.
Use additional
command-line options as you see fit.
 Windows setup copies the files onto the selected partition and installs the boot manager, but does not reboot the computer.
-
When the command prompt shows again, use
diskpart to determine the volume that Windows is being installed to. Here,
G: is the relevant volume:
X:\sources>diskpart.exe

Microsoft DiskPart version 10.0.26100.1150

Copyright (C) Microsoft Corporation.
On computer: MININT-FDBAGCJ

DISKPART> list vol

  Volume ###  Ltr  Label        Fs     Type        Size     Status     Info
  ----------  ---  -----------  -----  ----------  -------  ---------  --------
  Volume 0     D   CDROM        CDFS   DVD-ROM      460 KB  Healthy
  Volume 1     E   CCCOMA_X64F  UDF    DVD-ROM     5699 MB  Healthy
  Volume 2     F   VMware Tool  CDFS   DVD-ROM      150 MB  Healthy
  Volume 3     G                NTFS   Partition     59 GB  Healthy    Pagefile
  Volume 4     C                FAT32  Partition    100 MB  Healthy    Hidden

DISKPART> exit

Leaving DiskPart...
-
Disable the creation of 8.3 file names on that volume:
X:\sources>fsutil.exe 8dot3name set g: 1
Successfully DISABLED 8dot3name generation on "g:"
-
Remove all already created 8.3 file names:
X:\sources>fsutil.exe 8dot3name strip /s /f g:\
Scanning registry...

Total affected registry keys:                   1

Stripping 8dot3 names...

Total files and directories scanned:       146306
Total 8dot3 names found:                    82755
Total 8dot3 names stripped:                 82755

For details on the operations performed please see the log:
  "X:\windows\SystemTemp\8dot3_removal_log @(GMT 2024-09-14 19-51-49).log"
-
Run
wpeutil.exe reboot to reboot the computer and start the second phase of Windows setup.
Method #2 – Stripping 8.3 file names from install.wim
For whatever reason, the Windows 10 and Windows 11 WIM images (boot.wim and install.wim) contain 8.3 file names. This can be demonstrated e.g. using 7-Zip:
C:\>"%ProgramFiles%\7-Zip\7z.exe" l -slt "install.wim" | findstr.exe /r /c:"^Short Name = [A-Z]"
Short Name = PROGRA~1
Short Name = PROGRA~2
Short Name = COMMON~1
Short Name = INTERN~1
Short Name = WINDOW~1
Short Name = WINDOW~2
Short Name = WI54FB~1
Short Name = WI7A8C~1
…
It turns out that Windows is installed with 8.3 file names exactly because the install.wim contains 8.3 file names. Therefore, if you strip all 8.3 file names from the install.wim, Windows will be installed without them.
- Download a Windows 10 or Windows 11 ISO image.
- Extract the ISO image.
-
Locate the
install.wim file in the sources subfolder.
- Download a copy of PsExec.exe as
fsutil.exe must be executed in the SYSTEM account.
-
Open a PowerShell session with Administrator privileges and run this PowerShell code:
function Remove-WimShortNames {
    [CmdletBinding()]
    param(
        [Parameter( Mandatory )]
        [string]
        $WimFile,

        [string]
        $MountDirectory = 'C:\mnt',

        [ValidateSet( 'Errors', 'Warnings', 'WarningsInfo' )]
        [string]
        $LogLevel = 'Errors',

        [string]
        $PsExecPath = "$env:ProgramFiles\SysinternalsSuite\PsExec.exe"
    );

    if( -not [System.IO.File]::Exists( $WimFile ) ) {
        throw "File '$WimFile' does not exist.";
    }

    if( -not [System.IO.File]::Exists( $PsExecPath ) ) {
        throw "File '$PsExecPath' does not exist.";
    }

    $params = @{
        LogLevel = $LogLevel;
    };

    mkdir -Path $MountDirectory -ErrorAction 'SilentlyContinue' | Out-Null;
    Get-WindowsImage -ImagePath $WimFile @params | ForEach-Object -Process {
        "Now processing edition '{0}'. Mounting to '{1}'." -f $_.ImageName, $MountDirectory | Write-Host;
        Mount-WindowsImage -Path $MountDirectory -ImagePath $WimFile -Name $_.ImageName @params;
        & $PsExecPath -s "$env:windir\system32\fsutil.exe" 8dot3name strip /f /s $MountDirectory;
        if( $LASTEXITCODE ) {
            throw "fsutil.exe exited with error code $LASTEXITCODE.";
        }
        Dismount-WindowsImage -Path $MountDirectory -Save @params;
    };
    Remove-Item -LiteralPath $MountDirectory -Force;
}
Remove-WimShortNames.ps1
-
Call the function with the path of the .wim file:
Remove-WimShortNames -WimFile 'C:\iso\sources\install.wim';
install.wim (such as Home or Education) one after another. Use a mount directory with a path as short as possible, such as C:\mnt. Otherwise, the resulting file paths might become too long.
-
Copy the extracted ISO image (which now includes the modified
install.wim) to a bootable USB stick, or use software such as
ImgBurn to create a bootable DVD or a bootable ISO image.
-
Install Windows as usual.
Conclusion
After Windows has been installed, make sure that
dir c:\ /a /x does not show any 8.3 file names and that
%windir%\system32\fsutil.exe 8dot3name query c: reports 8.3 file name are not generated.
Note that the
/f parameter of
fsutil is safe to use since the registry hive files contained in
install.wim, such as
\windows\system32\Config\SYSTEM or
\Users\Default\NTUSER.DAT, do not reference any 8.3 file names.