Windows Setup will automatically search for autounattend.xml files at various locations, including the root folders of each removable drive. Therefore, to perform unattended Windows installations, there is no need to use third-party software or to modify .iso or .wim files. Just follow these steps:
Click the button at the bottom of the page to download the unattend.iso image.
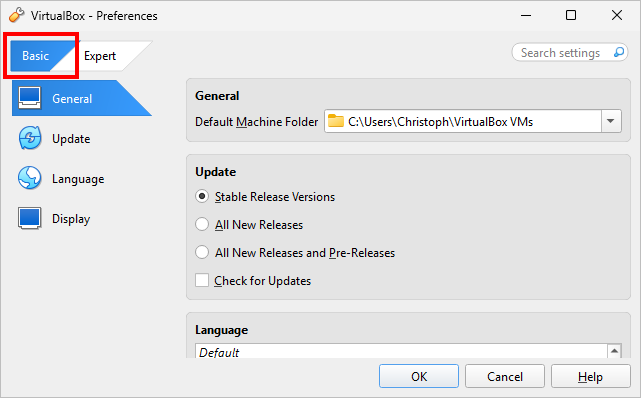
The VirtualBox UI comes in two flavors, Basic and Expert, and the following screenshots all use Basic mode. Go to FilePreferences… to switch to Basic mode:
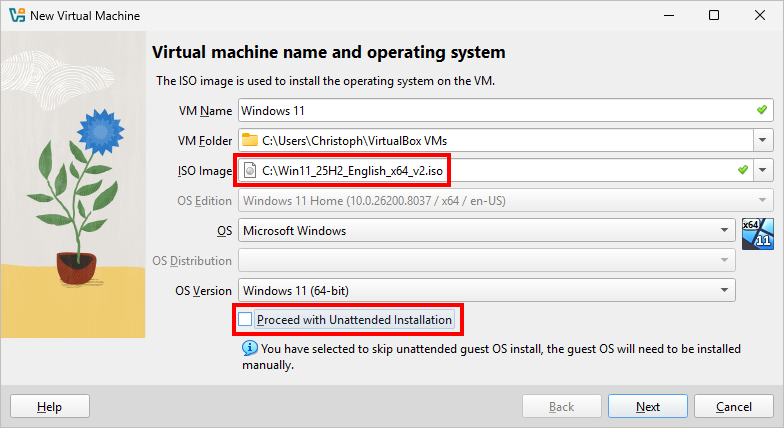
Create your VM and choose the Windows installation image, such as Win11_25H2_English_x64_v2.iso. Since we want to use our own autounattend.xml file and not the one provided by VirtualBox, deselect the Proceed with Unattended Installation setting:
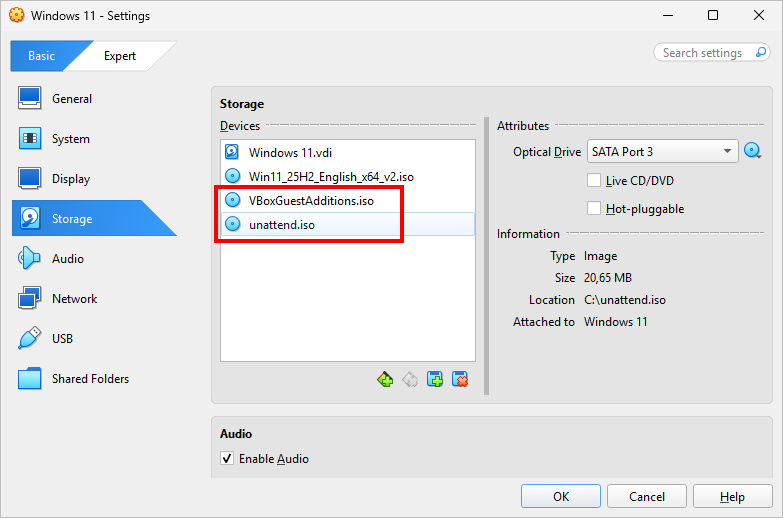
Open the Settings dialog for the new VM and attach two more images as optical drives:
The Guest Additions image, which can be found at C:\Program Files\Oracle\VirtualBox\VBoxGuestAdditions.iso
The unattend.iso image downloaded earlier
Start the VM to begin the unattended installation.
You can now use a SCSI hard disk and a VirtIO SCSI single controller because the autounattend.xml file will automatically install the necessary drivers at the beginning of the PE stage. You will also have network connectivity throughout Windows Setup.
Select the option. This will make your SCSI disks accessible to Windows Setup.
Adjust the other settings as you see fit.
Click the button at the bottom of the page to download the unattend.iso image.
Upload these .iso files to Proxmox:
The Windows installation image, such as Win11_25H2_English_x64_v2.iso
The virtio-win-*.iso image, which contains the virtio-win-guest-tools.exe installer and can be downloaded in its
latest stable or its
most recent version
The unattend.iso image downloaded earlier
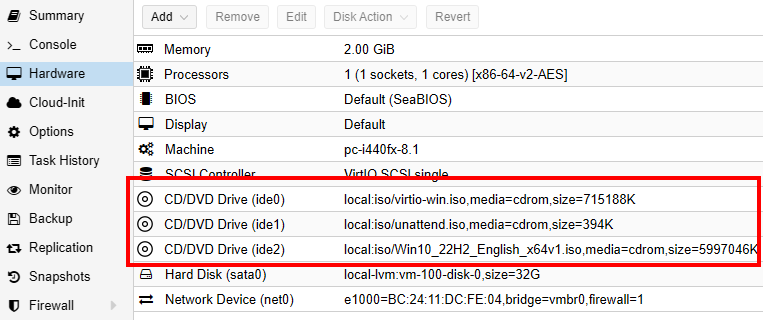
Create your VM and configure its CD/DVD drives as follows:
Start the VM to begin the unattended installation.
Adjust the settings as you see fit. Note that there is no option to install the vmguest.iso image because it is
no longer needed or included in Hyper-V.
Click the button at the bottom of the page to download the unattend.iso image.
Create your VM.
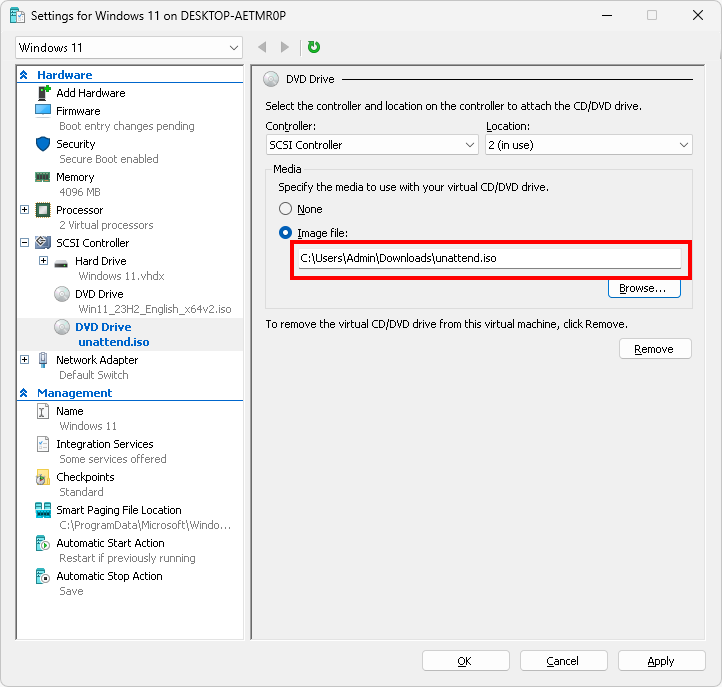
Add an additional DVD drive to the VM and attach the unattend.iso image downloaded earlier:
Start the VM to begin the unattended installation.
Click the button at the bottom of the page to download the unattend.iso image.
Attach the following images to your VM as optical drives:
The Windows installation image, such as Win11_25H2_English_x64_v2.iso
The Parallels Tools image appropriate for your processor architecture (prl-tools-win.iso or prl-tools-win-arm.iso), which can be found at /Applications/Parallels Desktop.app/Contents/Resources/Tools
The unattend.iso image downloaded earlier
Start the VM to begin the unattended installation.
You can instruct Windows Setup to look for a folder named $OEM$ on your installation medium and recursively copy its contents to the target system during the PE stage. When you use an autounattend.xml file, include the <UseConfigurationSet>true</UseConfigurationSet> element to trigger this behavior. In my generator, checking the option will create this element.
See Microsoft's documentation for how the $OEM$ folder and its subfolders are processed. For example, you could create your installation medium as follows:
boot
efi
sources
support
autorun.inf
bootmgr
bootmgr.efi
setup.exe
autounattend.xml
$OEM$
$1
Users
Public
Desktop
foo.txt
Do not create folders for future user profiles this way. When Windows Setup creates an user account Foo and its default user profile folder C:\Users\Foo already exists, it will not reuse that existing folder, but create a new one with a cryptic name, such as C:\Users\Foo.DESKTOP-ZFAH8Z2.
During the PE stage, Windows Setup will copy the file in the $OEM$ folder to the target volume, preserving its relative path. Together with the applied Windows image, the C:\ drive would look like this when the installation has finished:
When you place a folder named $WinPEDriver$ on your installation medium, Windows Setup will recursively scan this folder for .inf files and automatically install the corresponding device drivers during the PE stage.
Some vendors provide driver packages simply as .zip files, others may use self-extracting archives as .exe files. In any case, a suitable device driver will typically consist of one .inf, .sys and .cat file each. For example, to install Intel Wi-Fi drivers, download the .zip file, unzip it and place its contents in the $WinPEDriver$ folder. The folder structure on your installation medium would then look like this:
That scheduled task had previously executed VBScript code. VBScript has since been deprecated by Microsoft. To migrate the task from VBScript to PowerShell, run this command in an elevated PowerShell session:
When the setting was checked, as a side effect the Manage devices button in the Mobile devices section in Settings is disabled. To enable that button, run this command in an elevated PowerShell session and reboot the computer:
Use PowerShell instead of VBScript to move active hours
The scheduled task MoveActiveHours, which periodically moves your active hours in order to prevent Windows Update from rebooting your computer, had previously executed VBScript code. VBScript has since been deprecated by Microsoft. To migrate the task from VBScript to PowerShell, run this command in an elevated PowerShell session:
autounattend.xml files generated by this service work with any version of Windows 10 and Windows 11, including 24H2, 25H2 and 26H2, in both ConX and legacy setup modes. When an answer file is not processed as expected, check for the following:
There might be another answer file somewhere on your installation medium that is higher up in the search order and thus takes precedence over your autounattend.xml file. Check the X:\Windows\setupact.log and X:\$WINDOWS.~BT\Sources\Panther\setupact.log log files to determine which answer files are present.
Use the original Windows 10 or 11 .iso images from Microsoft, like Win11_25H2_English_x64_v2.iso. There is hardly a reason to modify .iso or .wim files anyway, which is a lengthy and error-prone process. Use custom scripts in your autounattend.xml file instead.
During Windows Setup, several files are created that may contain sensitive data:
Windows Setup places copies of your autounattend.xml file at C:\Windows\Panther\unattend.xml and C:\Windows\Panther\unattend-original.xml. These files may contain account passwords.
C:\Windows\Setup\Scripts\Wifi.xml will contain the Wi-Fi profile you entered, including the password.
Previous versions of the generator did not delete these files. The current version of the generator does delete them, unless the checkbox is selected.
Furthermore, files embeddeded in the autounattend.xml file will be extracted to the C:\Windows\Setup\Scripts folder. Check these files when you have entered sensitive data in custom scripts.